Run your search on other databases
Run your search on other databases
After you have run your search on one database (for health questions you often start with MEDLINE), you need to adapt and run it on your other databases. Your new search should be the same as your original 'master' search, only changing as much as necessary to get it to work in the new database.
You cannot simply re-run a MEDLINE search across Embase and Emcare. You need to search Embase for the appropriate Emtree theaurus headings. These are not necessarily the same as the MEDLINE subject headings.
This page will show you how to adapt your master search to a variety of other databases often used in systematic searching.
| Please note: database interfaces change frequently, and some of the resources on this page no longer match the current interfaces. The Library is currently reviewing all resources on this page. |
| The following PDF guides show how to adapt your search to a range of databases. Correct at the time of production but subject to interface changes! |
| Aug. 2025: EBSCOhost has a new interface and may look different in some existing Guides. Updating is underway! |
-
Translating your search to ScopusPDF current Feb. 2024
-
Translating your search to Web of SciencePDF current Dec. 2021
-
Adapting your search for CINAHLPDF current Aug. 2025
-
Translating your search to SPORTDiscusPDF current Jan. 2022
-
Translating your search to Cochrane LibraryPDF current Aug. 2022
-
Translating your search to ERICPDF current Aug. 2023
-
Translating your search to ProQuest Dissertations and Theses GlobalPDF current at Apr. 2022
Tips and tools for adapting searches
Different databases use different search syntax, operators, and default search fields. When you are remapping your master search to your chosen databases, it is important to consider whether you will need to adapt any aspects of your search strategy such as phrase searches, truncation, wildcards, and adjacency.
The PDF below shows how to adapt these elements across a number of key databases:
-
Finding the evidence: key search tipsHow to search various databases: phrases, truncation, adjacency and more. PDF handout
Search tools (databases, search engines, etc.) may only work properly when straight quotation marks " " are used.
Some programs (such as Word and PowerPoint) are configured to automatically use 'smart' quotes as you type. These will appear with clear differences marking the opening and closing quotation marks. 'Straight' quotation marks appear without this differentiation.

Avoid issues by switching to straight quotes in the program/s you use when designing search strategies.
You may need to retrospectively replace smart quotes if these are already present in your workings, or in strategies copied from other sources. This is easy to do using 'find and replace'.
-
Microsoft Support - Smart quotes in Word and PowerPointUsing 'curly' or 'smart' quotation marks in your search strategy can cause problems - these won't work in some databases. Avoid this copy and paste issue by switching to straight quotes following these instructions
-
Phrasing in reproducible search methodology: The consequences of straight and curly quotation marksBarrick et al. (2021), College and Research Libraries, 82(7)
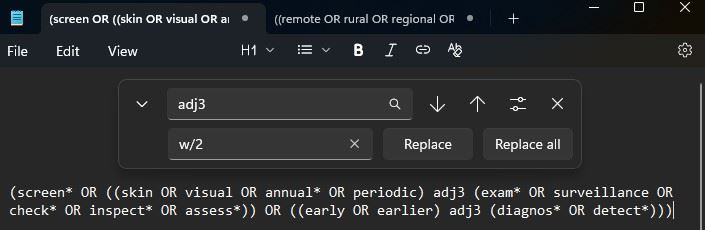
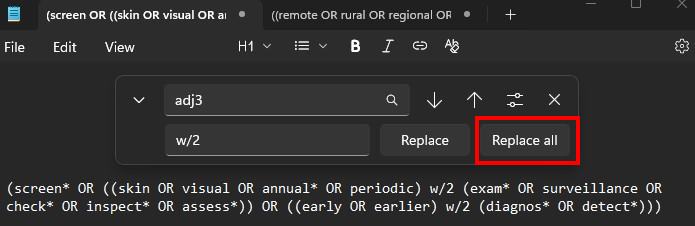
When adapting the search, batch changes may need to be made to make your searches run on different databases and interfaces.
'Find and replace' in programs such as Notepad and Word can make this easier.
For example, you can: change adjacency operators; add straight quotes; change or remove field codes.
In this Notepad example, the text to be altered was entered, then Find and Replace opened via Ctrl + H. The adjacency operator for Ovid databases can now be easily swapped out for the equivalent to configure this for Scopus.
-
Microsoft Support - Find and replace text in WordBatch find and replace text in Word using these instructions. Quick access this tool via Ctrl H. Useful for adapting and cleaning up strategies e.g. changing adjacency operators, and smart quotes to straight quotes
Adapting a search in Ovid - method 1
The steps below represent our recommended method of adapting a search to another database on the Ovid platform, to save time and reduce errors.
- Create draft / master search in MEDLINE (Ovid)
- Share strategy with yourself via Email All Search History option
- Copy keyword lines from plain text section of Ovid email and save in plain text editor such as Notepad (PC) or TextEdit (Mac)
- This will be your master keyword file - these are the keywords that you will use across every database (including those without subject headings, such as Scopus)
- Copy MEDLINE subject headings into a MeSH column
- Create columns for all other relevant thesauri e.g. Emtree (Embase, Emcare) and APA (PsycInfo)
- You may find a notes column for each thesaurus helpful
- Search for subject headings for each concept as you did for MEDLINE
- You may find that the heading is the same, slightly different, a synonym, or not available as a subject heading in this thesaurus
- Beware that exploding subject headings may find a different set of narrower terms in the new database
- Add equivalent and new subject headings to the spreadsheet
- Revisit your previous databases and check if newly discovered subject headings have equivalents
- Update keyword lines in master keyword file with newly discovered terms (e.g from Emtree scope notes, or new subject headings)
- Create new plain text file with subject headings for that database, master keyword lines, and line combinations (e.g. 3 AND 7)
- There are instructions on how to use the launcher on the Top tools and techniques page. NOTE: the Launcher may not work with more complex searches off-campus.
The session recording below shows the process in action, demonstrating how to adapt your search from MEDLINE to Embase and finally to Scopus.
Adapting a search in Ovid - method 2
Select the headings below to learn how to remap your MEDLINE search to other Ovid databases. The process is the same whether you are remapping to Embase, Emcare, or PsycINFO.
Select the headings below to learn how to remap your search in Ovid.
- Log in to MEDLINE and run your search.
- Then select Change under the Search Tools box.

- A new window will appear, listing the range of Ovid databases.
- Select one of the databases to search (eg Embase) and then select Run Search.
- Ovid will now run your search on this new database, ready for you to check and correct.
- Your subject heading lines can be identified by the presence of a forward slash / after the term, see below.

- You will need to check any MeSH to ensure that they have mapped across correctly. To do this:
- Look up each term without the forward slash (e.g. enter back pain not back pain/).
- You may find that the heading is the same, slightly different, a synonym, or not available as a subject heading in this thesaurus.
- Check the scope note (i icon on right) to establish that headings cover the same ideas as the original MeSH.

- Select the subject heading hyperlink to view the subject hierarchy - you may identify additional related or nested terms.
Note: Emcare and Embase share the same subject headings, so if you have run your search on Embase, you can rerun it on Emcare without any changes.
- Keyword lines will not have a forward slash/ and will end in a field code such as .mp, which is the default code in Ovid.

- When remapping searches to different Ovid databases, you do not generally need to change your keyword lines.
- You may, however, choose to change your field codes. E.g. to search across title, abstract and author-supplied fields in MEDLINE, Embase or Emcare you would use .ti,ab,kf.
- When you have identified the correct subject headings for this database, you need to edit your search by selecting More > Edit.

- Replace the term with the new subject heading, being sure to add the forward slash after the term (eg Backache/)
- Run the search
- Save your search as a new copy. Include the database name in the title (eg Search: Embase version)
- If you discover additional relevant subject headings, you can add these to your search. Just be sure to:
- Revisit your previous databases and check if the term (or a similar subject heading) appears.
- If so, add it to those searches too, and correct your combination lines.
- Regardless, update the keyword line to include the new term for all databases.
- If the subject headings are too broad or are not relevant, remove that subject heading line from your search. Be sure to correct your combination lines.
- Remember the aim is to cover the same search scope as your master MEDLINE search.
Guidelines and standards
'If a tool was used to automatically translate search strings for one database to another, specify the tool used.' PRISMA 2020 Explanation and Elaboration, p. 7
Note: while PRISMA acknowledges use of automation tools for adapting your search, these can be complex to learn and the results of varying quality. If you frequently undertake systematic searching, you may wish to explore these.
Other standards
-
Overview of reviewsSee the Overview page of this guide for additional guidelines and standards.
Database thesauri (controlled vocabulary)
Many databases use a thesaurus. It's important to note which is used by the databases you search.
| Database | Thesaurus |
| Cochrane Library databases | Medical Subject Headings (MeSH) (select records only) |
| MEDLINE | Medical Subject Headings (MeSH) |
| Emcare, Embase | Emtree |
| PsycInfo | Thesaurus of Psychological Index Terms |
| SPORTDiscus | Sports Thesaurus |
| CINAHL | CINAHL Subject Headings |
| ERIC | ERIC Thesaurus |
| ProQuest Dissertations and Theses, Web of Science databases, Scopus | Inconsistently applied subject headings from various thesauri may be present. Search using keywords |
- A comparison of Emtree and MeSH (Elsevier)This short paper compares MeSH and Emtree
- Using CINAHL/MeSH Subject Headings (EBSCOhost)Guidance on using headings in CINAHL
- Emtree: The deep indexing of Embase (Elsevier)Describes how Emtree works
- Thesaurus'Background information on the ERIC Thesaurus and guidance on how to find and use descriptors to help narrow your ERIC search' - ERIC website, Institute of Education Sciences
Exporting large numbers of records
Comprehensive searches often require screening thousands of records. Exporting these from databases to a reference manager is not always straightforward.
Here you will find guidance on how to 'batch' export records from various interfaces to EndNote (you may need to adjust for other reference managers).
General tips:
- look for options that allow you to export out records with the information you need to help you screen and locate the full text - such as the abstract and digital object identifer. Some batch export options omit key details
- always check that the number you export is the number that loads into the reference manager. If some are 'lost' start again with smaller batch sizes
Recommended maximum per export - 1,500

In this example, there are 3,360 results. You would export this in three batches.
- Ensure the correct line is selected to Display results - your final set of search results

- Type 1-1500 into the Range box and then click Export
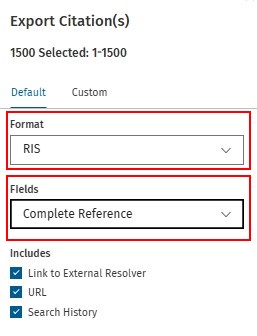
- Wait for 'null' to disappear and then ensure the Format is set to RIS or EndNote and Fields to Complete Reference. You can ignore Includes. Use RIS for MEDLINE, EndNote and Emcare, and EndNote for PsycInfo
- Click the Export button
- 'Processing' appears, followed by a green 'Citation(s) exported' pop-up box
- Open the ris or cgi file and it will load to your open EndNote Library
- To avoid confusion, we recommend moving the file to Trash once loaded
- Return to the Range box and enter the next range of records e.g. 1501-3000
- Repeat the steps above, finishing with the range 3001-3360 for the example above
- You should now see the same number of records as in your search results and can add these to the relevant database group in your EndNote Library
To batch download records to a reference manager, the easiest way is to send a link to the records to your email (maximum 25,000).
- Sign in to MyEBSCO
- Ensure you are displaying the set of results you want to export (you may need to access this from Recent activity or Saved)
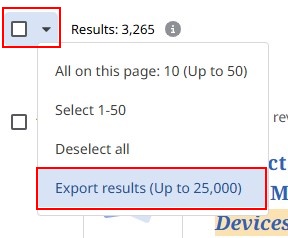
- Click on the drop-down-arrow next to the number of results
- Click Export results (Up to 25,000)
- The Export results window appears
- Enter you email address under Email address
- Choose RIS from Select a format if exporting to EndNote (this also works for many other reference managers, such as Zotero). If sent to a University address there may be a delay (e.g. half hour). If you have access to email through another provider it may arrive more quickly
- Click Send
- The Export requested pop-up screen appears
- When the email arrives, click the Download metadata button
- Open the ris file with the target EndNote Library open
- You should now see the same number of records as in your search results and can add these to the relevant database group in your EndNote Library
The best approach for large numbers of results (maximum 20,000 at a time) is Export Results, visible at the top of the results page when signed in to My Research. Key details needed for deduplication and screening tools - such as authors, year, title, abstract, volume, issue and Digital Object Identifier (DOI) - will be included.
If you need or want additional details from records (such as keywords and language) – you will need to use the time consuming approach of adding records to the temporary folder Selected items page by page, and then exporting out in batches of 1,000 or fewer.
The first option is described here.
- Ensure you are signed into your My Research via the person icon to the top right-hand-side of the screen (create a personal account with ProQuest if you don't already have one)
- Ensure you are displaying the set of results you want to export
- Click Export Results from the top of the results screen
- Select format: RIS
- Include abstracts: Yes
- Accept the Terms and Conditions - this automatically saves the search
- Click My Research to access this menu and then click Saved searches
- Depending on the number of records, your export may still be processing
- When available, click the link for Export Results for the relevant search
- A ris file will download
- Open the ris file with the target EndNote Library open
- You should now see the same number of records as in your search results and can add these to the relevant database group in your EndNote Library
Records need to be exported in batches of 100. Databases on Informit can have significant numbers of duplicates, even when searching only one database.
- Ensure you are displaying the set of results you want to export
- From the top or bottom of the page change the Per page option to the maximum permitted, 100
- Tick Select All
- Click Export Citations (100 items)

- Under Download Citation ensure RIS is checked, and then click Download
- A ris file will download
- Open the ris file with the target EndNote Library open
- Repeat for as many pages as needed
- You should see the same number of records as in your search results and can add these to the relevant database group in your EndNote Library
You can export up to 20,000 records at a time from Scopus.
- Ensure you are displaying the set of results you want to export
- If your search results are 20,000 or fewer in number, click All and then Select all
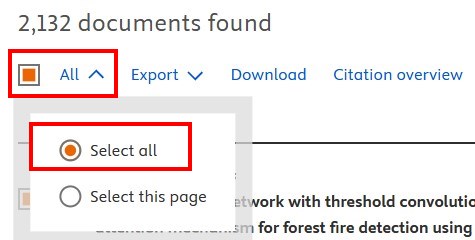
- Click Export and for EndNote choose RIS or EndNote (RIS)
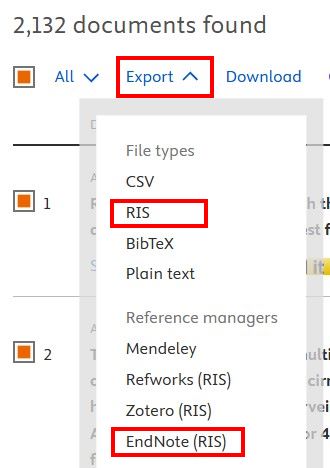
- Choose the options you will need for deduplication, screening, discovery and citation; e.g. most of the Citation information and Bibliographical information, and Abstract - customise to suit your needs
- Click Export
- Nothing may happen for a moment. Then a pop-up appears: Exporting x documents to RIS in the background
- To access your exports, click on your inititals to the far top right-hand-side of the screen and click Exports
- Click Download RIS for the relevant search
- A ris file will download
- Open the ris file with the target EndNote Library open
- You should now see the same number of records as in your search results and can add these to the relevant database group in your EndNote Library
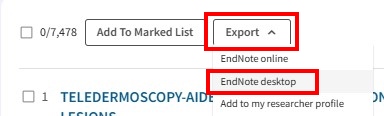
You can export up to 1,000 records at a time from Web of Science.
- Ensure you are displaying the set of results you want to export
- Click Export and then EndNote desktop from the menu
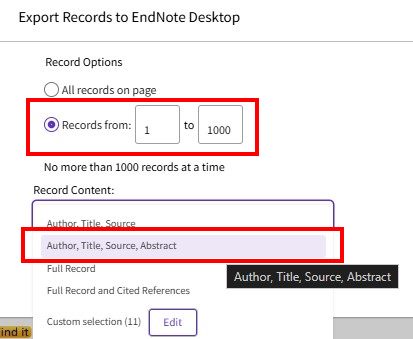
- Change the selection to Records from 1 to 1000 (and change this range if needed for larger sets of records e.g. 1-1000, 1001-2000, etc.)
- Change Record content to Author, Title, Source, Abstract or create your own Custom selection with the details required for deduplication, screening, etc.
- An Export in progress box appears
- A ciw file will download
- Open the ciw file with the target EndNote Library open
- Repeat for as many sets as needed
- You should see the same number of records as in your search results and can add these to the relevant database group in your EndNote Library
Adapting your search - videos
Further database support
- Searching ACM Digital LibraryGuide from University College London Library Services