EndNote
Please note that with databases on Ovid, it is best to use RIS format when exporting from MEDLINE, Embase, or Emcare and the EndNote format when exporting from PsycInfo.
EndNote overview
 To prepare for screening, we recommend you export your database search results into EndNote.
For stability and ease of use, we suggest you use EndNote Desktop rather than EndNote Web.
If you are new to the program, start by familiarising yourself with EndNote generally. The Library has a range of resources available to support you.
- UniSA EndNote GuideA step by step guide for getting started with EndNote.
- EndNote workshopsRegister for upcoming face-to-face or online workshops to learn EndNote.
- Installing EndNoteInstall EndNote on your own computer (Windows or Mac OS)
Step 1: Build your EndNote library
| Organise your references |
|
 |
If you plan to deduplicate using EndNote, export records from high quality sources first - as EndNote will send the most recently added records detected as duplicates to the 'Trash', retaining those added first. Databases on Ovid such as MEDLINE are a good place to start, followed by other reputable databases such as CINAHL. Add records from Web of Science and/or Scopus after the key databases with subject headings, and before incomplete/error-prone sources such as Google Scholar.
| Exporting references from Ovid Emcare |
When exporting from Ovid Emcare, you may be prompted to use an 'Import Filter'. Select the EMCARE (Ovid) filter. If this does not appear in your list, select 'Other Filters' and search for it. If the filter still does not appear, search for it in the EndNote Import Filters page, which lists new and updated filters to download.
To download and install a filter:
- Close EndNote
- In your browser, select the filter link
- Save the file in your filters folder:
- Windows: C:\Program Files\EndNote #\Filters (Where # is the version number for EndNote)
Mac OS: Applications\EndNote #\Filters (Where # is the version number for EndNote) - see Folder Locations for more information
- Windows: C:\Program Files\EndNote #\Filters (Where # is the version number for EndNote)
- Open EndNote - the filter should now be listed
Learn more:
Exporting large numbers of records
Comprehensive searches often require screening thousands of records. Exporting these from databases to a reference manager is not always straightforward.
Here you will find guidance on how to 'batch' export records from various interfaces to EndNote (you may need to adjust for other reference managers).
General tips:
- look for options that allow you to export out records with the information you need to help you screen and locate the full text - such as the abstract and digital object identifer. Some batch export options omit key details
- always check that the number you export is the number that loads into the reference manager. If some are 'lost' start again with smaller batch sizes
Recommended maximum per export - 1,500

In this example, there are 3,360 results. You would export this in three batches.
- Ensure the correct line is selected to Display results - your final set of search results

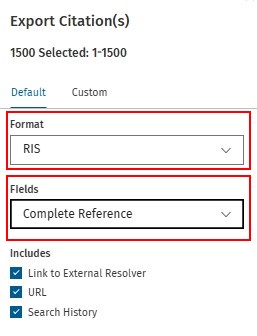
- Type 1-1500 into the Range box and then click Export
- Wait for 'null' to disappear and then ensure the Format is set to RIS or EndNote and Fields to Complete Reference. You can ignore Includes. Use RIS for MEDLINE, EndNote and Emcare, and EndNote for PsycInfo
- Click the Export button
- 'Processing' appears, followed by a green 'Citation(s) exported' pop-up box
- Open the ris or cgi file and it will load to your open EndNote Library
- To avoid confusion, we recommend moving the file to Trash once loaded
- Return to the Range box and enter the next range of records e.g. 1501-3000
- Repeat the steps above, finishing with the range 3001-3360 for the example above
- You should now see the same number of records as in your search results and can add these to the relevant database group in your EndNote Library
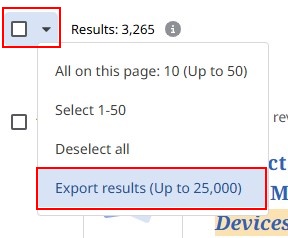
To batch download records to a reference manager, the easiest way is to send a link to the records to your email (maximum 25,000).
- Sign in to MyEBSCO
- Ensure you are displaying the set of results you want to export (you may need to access this from Recent activity or Saved)
- Click on the drop-down-arrow next to the number of results
- Click Export results (Up to 25,000)
- The Export results window appears
- Enter you email address under Email address
- Choose RIS from Select a format if exporting to EndNote (this also works for many other reference managers, such as Zotero). If sent to a University address there may be a delay (e.g. half hour). If you have access to email through another provider it may arrive more quickly
- Click Send
- The Export requested pop-up screen appears
- When the email arrives, click the Download metadata button
- Open the ris file with the target EndNote Library open
- You should now see the same number of records as in your search results and can add these to the relevant database group in your EndNote Library
The best approach for large numbers of results (maximum 20,000 at a time) is Export Results, visible at the top of the results page when signed in to My Research. Key details needed for deduplication and screening tools - such as authors, year, title, abstract, volume, issue and Digital Object Identifier (DOI) - will be included.
If you need or want additional details from records (such as keywords and language) – you will need to use the time consuming approach of adding records to the temporary folder Selected items page by page, and then exporting out in batches of 1,000 or fewer.
The first option is described here.
- Ensure you are signed into your My Research via the person icon to the top right-hand-side of the screen (create a personal account with ProQuest if you don't already have one)
- Ensure you are displaying the set of results you want to export
- Click Export Results from the top of the results screen
- Select format: RIS
- Include abstracts: Yes
- Accept the Terms and Conditions - this automatically saves the search
- Click My Research to access this menu and then click Saved searches
- Depending on the number of records, your export may still be processing
- When available, click the link for Export Results for the relevant search
- A ris file will download
- Open the ris file with the target EndNote Library open
- You should now see the same number of records as in your search results and can add these to the relevant database group in your EndNote Library
Records need to be exported in batches of 100. Databases on Informit can have significant numbers of duplicates, even when searching only one database.
- Ensure you are displaying the set of results you want to export
- From the top or bottom of the page change the Per page option to the maximum permitted, 100
- Tick Select All
- Click Export Citations (100 items)

- Under Download Citation ensure RIS is checked, and then click Download
- A ris file will download
- Open the ris file with the target EndNote Library open
- Repeat for as many pages as needed
- You should see the same number of records as in your search results and can add these to the relevant database group in your EndNote Library
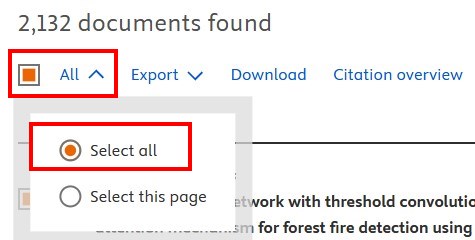
You can export up to 20,000 records at a time from Scopus.
- Ensure you are displaying the set of results you want to export
- If your search results are 20,000 or fewer in number, click All and then Select all
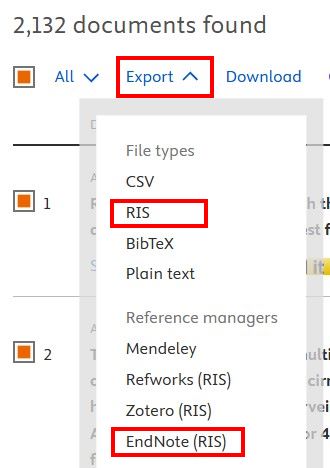
- Click Export and for EndNote choose RIS or EndNote (RIS)
- Choose the options you will need for deduplication, screening, discovery and citation; e.g. most of the Citation information and Bibliographical information, and Abstract - customise to suit your needs
- Click Export
- Nothing may happen for a moment. Then a pop-up appears: Exporting x documents to RIS in the background
- To access your exports, click on your inititals to the far top right-hand-side of the screen and click Exports
- Click Download RIS for the relevant search
- A ris file will download
- Open the ris file with the target EndNote Library open
- You should now see the same number of records as in your search results and can add these to the relevant database group in your EndNote Library
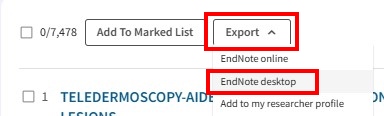
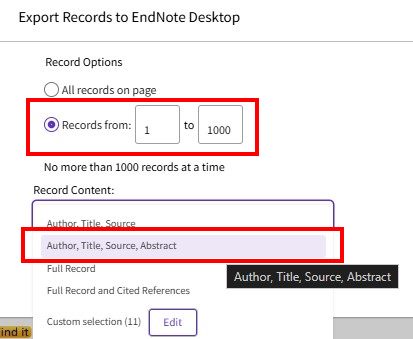
You can export up to 1,000 records at a time from Web of Science.
- Ensure you are displaying the set of results you want to export
- Click Export and then EndNote desktop from the menu
- Change the selection to Records from 1 to 1000 (and change this range if needed for larger sets of records e.g. 1-1000, 1001-2000, etc.)
- Change Record content to Author, Title, Source, Abstract or create your own Custom selection with the details required for deduplication, screening, etc.
- An Export in progress box appears
- A ciw file will download
- Open the ciw file with the target EndNote Library open
- Repeat for as many sets as needed
- You should see the same number of records as in your search results and can add these to the relevant database group in your EndNote Library
Step 2: Back up your EndNote library
It is a good habit to back up your EndNote library. Specifically:
- keep at least two of the same back-ups in different locations,
- back-up on a regular basis or;
- whenever you make significant changes (e.g import from a database).
| Create a back-up library |
- Select File > Compressed Library (.enlx)
- Follow the prompts and name the file
(e.g. my_review_backup_29_5_2020.enlx)

Learn more:
Video Length: 2:15
Step 3 (optional): Deduplicate your EndNote library
| Note: Skip this step if you are using Covidence for screening, as Covidence will perform its own deduplication. |
| Rename your group |
|
Before you deduplicate your references in EndNote, rename your groups by adding the total number of results from each database (see example image), for reporting purposes. To rename a group:
The total number of references will need to be reported in your PRISMA flowchart.
|
 |
| Deduplicate your references |
Use EndNote's Find Duplicates function to remove multiple copies of references. (X9: References > Find Duplicates; 20: Library > Find Duplicates).
This will change both:
- the number of results displayed next to each group; and
- the total number of references in your library.
Learn more:
Video Length: 1:03
Step 4: Export your EndNote library
Now that your Library is complete, you can export the references within it to commence screening.
Covidence: you can either export all references in one file and specify the sources later, or export the references for each source separately and select the sources on import, for this to appear in the Covidence PRISMA flowchart. Each file must be under 50 MB (this is about 11,000 references from databases on Ovid).
- Select All References (located in the Groups pane on the left hand side) OR
- Select the file range you want to export (e.g. by clicking on record number 1, then number 11,000 while holding Shift)
- Select File > Export
An export window will appear (for simplicity, we suggest saving to the desktop).
- Untick Export Selected References
- Make the following selections:
| If you are screening in: | Save As Type | Output Style |
| Excel | XML | Tab Delimited |
| Covidence | Text File (*.txt) | RefMan (RIS) Export |
Next steps
Learn how to import the file and undertake screening in Covidence.
